
Greetings! I'm attempting to replace the rear shocks and my shock mounts don't look anything like pictures and videos I've seen. I bought the car at 130K and have 180K on it now. Could someone please check the picture I'm attempting to attach and tell me if this is how it's supposed to be? The bolts are inaccessible.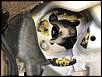
| home | news | features | forums | product reviews | resources | photos | marketplace | contact |
Results 1 to 10 of 12
Thread: 2002 V70 XC Rear Shocks
-
05-22-2021, 03:05 PM #1
 Junior Member
- Join Date
- Aug 2019
- Location
- Lubbock, TX, USA
- Posts
- 15
 2002 V70 XC Rear Shocks
-
05-22-2021, 04:57 PM #2
Senior Member
- Join Date
- Apr 2017
- Location
- San Diego
- Posts
- 182
Yes, all is correct in your picture. It's a coilover spring/shock combination. You remove the spring and shock together. You'll need a spring compressor to separate the spring from the shock once the assembly is off the car. I think there is a tutorial including the factory service manual directions in the "Resources" section of this site linked at the very, very top of the web page.
This took about 30 seconds to find on youtube.
https://www.youtube.com/watch?v=_qFKFgJ7PnM
Couple of notes. The spring/strut is held fairly tight even when rear tire is jacked off the ground. This i because there's a lot of upward tension on the hub from the suspension bushings. You may be able to slip off the bottom mount of the spring/strut with a pry bar. Be ready for it to violently release that tension, if you haven't secured the hub in any way. When reinstalling the spring/strut, you need to lever down very hard on the hub to fit the spring/strut lower mount back on the peg on the control arm. Volvo's factory method to hold the hubs in a lowered position is to put a ratchet strap between the two rear hubs and ratchet it really tight. I found I could use a bottle jack to jack the hub down to allow strut installation by removing the bump stop and using that as a platform for the base of the jack. The piston of the jack was positioned on the bracket bolted to the body that the bump stop is supposed to contact. Maybe the pic helps. You also need to be careful to put the rubber spring mount back in the exact same position in the upper shock hat as it was originally otherwise the shock hat won't line up with mounting positions in the body.
BrettLast edited by Brett San Diego; 05-22-2021 at 05:34 PM.
-
05-22-2021, 05:38 PM #3
Junior Member
- Join Date
- Aug 2019
- Location
- Lubbock, TX, USA
- Posts
- 15
Thanks very much for your reply! I've been researching this a long time and was reluctant to tackle this job because of the expense and time and spring compressor danger. A recent post on here (which I can't find at the moment) mentioned that the shocks may be in a spring perch and that the shock could be dropped out without having to do anything with the spring. I was really hoping that was the case.
-
05-30-2021, 06:52 AM #4
Senior Member
- Join Date
- Dec 2009
- Location
- GA
- Posts
- 1,420
Sorry - you will need to compress the spring to replace the shock
-
06-03-2021, 02:25 PM #5
Junior Member
- Join Date
- Aug 2019
- Location
- Lubbock, TX, USA
- Posts
- 15
Problem installing new strut assemblies
I got the new strut assembly mostly in but how much pressure can I apply to the rear control arm to slip the bottom strut mount on? It seems to require more downward pressure than my body weight. See images. Any help greatly appreciated!
-
06-03-2021, 02:46 PM #6
Junior Member
- Join Date
- Aug 2019
- Location
- Lubbock, TX, USA
- Posts
- 15
Thanks Brett! I'm about to try your ratchet strap/bottle jack suggestion.
-
06-03-2021, 03:16 PM #7
Junior Member
- Join Date
- Aug 2019
- Location
- Lubbock, TX, USA
- Posts
- 15
Success! Easy peasy with a little bottle Jack!
-
06-03-2021, 08:18 PM #8
Senior Member
- Join Date
- Apr 2017
- Location
- San Diego
- Posts
- 182
Glad you got 'er dun. I remember taking that picture thinking I doubt this is ever going to be useful to anyone. Thanks for proving me wrong.
BrettLast edited by Brett San Diego; 06-03-2021 at 08:24 PM.
-
06-03-2021, 08:41 PM #9
Junior Member
- Join Date
- Aug 2019
- Location
- Lubbock, TX, USA
- Posts
- 15
I learned something very important today: when Brett or anyone takes their valuable time to send you detailed instructions, read them carefully before attempting that task! If I had studied your recommendations, it would have saved a lot of head scratching!
-
06-03-2021, 08:50 PM #10
Junior Member
- Join Date
- Aug 2019
- Location
- Lubbock, TX, USA
- Posts
- 15
I got driver side done today and will tackle the passenger side tomorrow. Ill take more pictures, including the bottle Jack trick. Id love to do it like a youtuber but never done that.

 Reply With Quote
Bookmarks